Choosing Wood Texture Aluminium Profiles involves more than matching a color to a catalog image. The right profile should suit the project’s use, appearance, and installation conditions. A warm oak effect may complement interior cabinetry, while a darker grain can create contrast around windows or screens. Yet photographs can hide differences in gloss, texture, and color. Samples help. View them in the space where they will be installed, under both daylight and artificial light.
Start by considering the profile’s dimensions, shape, and intended application. Check whether the surface pattern looks consistent across the lengths you need, especially at corners and joints. Ask the supplier how the wood effect is applied and request clear product specifications for the finish, coating, and recommended care. If the profiles will face strong sun, moisture, or frequent handling, confirm that the selected finish is suitable for those conditions. Do not assume every wood-look surface performs the same way.
Small details matter. Grain direction, edge appearance, and the way profiles meet can affect the finished result more than a close color match. When comparing options, inspect a physical sample and review installation guidance with the fabricator or supplier. That takes checking. It may feel fussy, but replacing a finish after installation is rarely simple. A thoughtful choice balances visual character with practical requirements, while leaving room to question assumptions made from a screen or a brief product description.
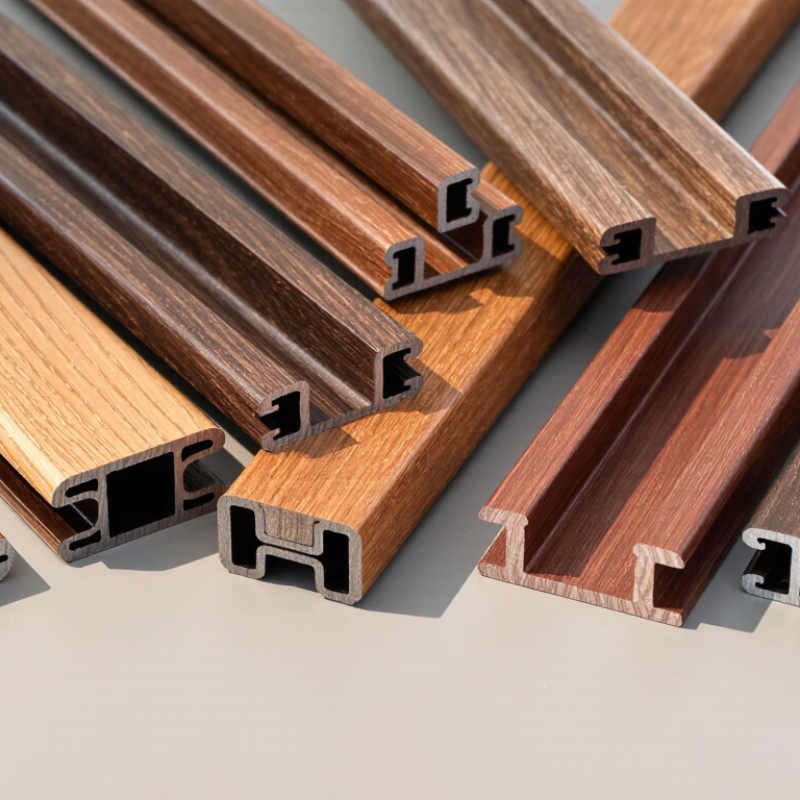
Wood texture aluminium profiles are extruded aluminium sections finished to resemble timber. They can frame windows, doors, screens, and façades while keeping the consistent dimensions of metal. The wood effect is a surface finish, not a layer of real wood. That distinction matters. The grain may look convincing from a few steps away, but close inspection can reveal a printed pattern.
Production usually begins with an aluminium profile shaped through an extrusion die. The surface is cleaned and coated, often with a powder coating that provides a base colour. A printed transfer film is then wrapped around the profile. Heat and pressure move the pigment from the film onto the coating, creating the visible grain. Temperature, timing, and surface preparation all affect the result. Small process differences can change the colour or sharpness.
The finished profile is checked for even coverage, alignment, and marks around corners or grooves. These details are easy to miss in a flat sample. Grain direction also matters: a vertical pattern on a tall frame may look more natural than a sideways one. The finish can resist everyday weathering, but performance depends on coating quality, installation, and care. It is not maintenance-free. Cleaning with a soft cloth helps avoid surface scratches, while harsh abrasives may dull the finish. A sample viewed outdoors often gives a truer impression than one under showroom lighting.
| Topic | What It Means | How It Is Made or Assessed | What to Check When Choosing |
|---|---|---|---|
| Product definition | An aluminium extrusion finished with a printed wood-grain appearance. The finish imitates the color and pattern of wood while retaining the underlying aluminium profile. | The profile is extruded, pretreated, coated, and decorated with a wood-grain pattern. The pattern is part of the applied finish, not natural wood. | Confirm that the sample shows the intended grain direction, color, and level of visual variation for the finished installation. |
| Aluminium alloy and temper | Architectural profiles commonly use aluminium alloys suited to extrusion, such as 6063. Temper describes the material’s mechanical condition after processing. | The billet is heated and pushed through a shaped die. The extruded profile is cooled and may be aged to achieve the specified temper, such as T5 or T6. | Request the alloy and temper on the product specification. Check that the profile’s strength and design are suitable for its intended application. |
| Profile design | The cross-section determines how the profile fits, connects, drains, and supports loads within a frame or other assembly. | A die forms the profile’s cross-section during extrusion. Cutting, machining, and assembly features may be added afterward. | Verify dimensions, wall thickness, tolerances, joining details, drainage paths, and compatibility with the project’s hardware or adjoining components. |
| Surface pretreatment | Pretreatment prepares the aluminium surface for coating and helps coating adhesion and corrosion resistance. | Typical production includes cleaning and chemical conversion treatment. The exact process depends on the coating system and applicable requirements. | Ask for the specified pretreatment process and relevant quality documentation. Poor surface preparation can contribute to coating adhesion problems. |
| Base coating | A compatible base layer provides the surface into which the wood-grain decoration is transferred or over which it is applied. | For common sublimation-transfer systems, a coated profile is cured before the printed transfer material is applied. Coating type and cure conditions vary by process. | Confirm that the coating system is intended for the transfer method and the expected indoor or outdoor exposure. |
| Wood-grain transfer | The printed pattern creates the visible wood-like finish. Pattern, color, and texture are design choices and can differ between production batches. | In a common heat-transfer process, printed film or paper is wrapped around the coated profile. Heat transfers the pattern into the coating layer; the transfer material is then removed. | Approve a production-representative sample. Check pattern repeat, color consistency, coverage at edges, and whether the grain direction suits the installation. |
| Finish performance | Durability depends on the coating system, pretreatment, manufacturing quality, and exposure conditions—not on the wood-grain appearance alone. | Performance can be assessed using applicable coating tests, such as adhesion, coating thickness, and weathering or corrosion-resistance tests. | Request test results or conformity documents relevant to the project. For exterior use, confirm that the finish is specified for the expected sunlight, moisture, and climate. |
| Color and batch matching | Wood-grain finishes can vary in shade and pattern because of printing, transfer, coating, and production conditions. | Samples and production parts are compared under consistent lighting and against an agreed reference where color matching is important. | Approve a reference sample before ordering. For visible continuous surfaces, consider ordering the required profiles together and checking batches before installation. |
| Maintenance | Routine care helps preserve the appearance of the coated surface. | Clean with water and a mild, non-abrasive detergent, then rinse and dry. Cleaning guidance should follow the finish supplier’s instructions. | Avoid abrasive pads, harsh chemicals, and unapproved solvents that may scratch or damage the coating. |
| Best-fit applications | Wood-texture aluminium profiles are used where a wood-like appearance is desired alongside an aluminium profile construction. | Typical uses include window and door components, façade details, screens, partitions, and decorative trim, subject to the profile’s design and finish specification. | Match the alloy, profile geometry, coating system, and finish specification to the application and its exposure conditions. |
View several profiles side by side from the same distance. Fine, straight lines often look calmer on narrow frames. Repeated knots can feel artificial across a long installation. Look closely.
Daylight and evening lamps can change how colors appear. Warm lamps may turn brown grain reddish or orange. Grey finishes can look cooler outdoors. Check samples beside nearby flooring or cabinetry.
Compare matte, satin, and glossy surfaces under steady light. Gloss may show glare and fingerprints. Embossed grain feels textured but can collect dust in deep grooves. There is no perfect finish.
Compare each profile with the approved project drawing. Measure width, height, wall thickness, and squareness at several points with a calibrated caliper. Use a straightedge to spot bowing. Record small differences.
Check thickness against the project specification using a suitable gauge. Look for pinholes, scratches, thin patches, and uneven color in neutral light. Inspect several profiles, including cut edges. One sample can hide flaws.
No. A sample cannot show every batch variation. Compare several pieces and ask how color and texture are controlled between production runs. I would not trust one attractive sample alone.
See whether the printed grain aligns across corners and joints. Small mismatches may stand out on a long façade. Check corners, cut ends, and edges for dents, burrs, or uneven transfer.
Request written tolerances for dimensions and finish, plus inspection records and coating test documents. Ask how approved samples are retained. Confirm packing and lead times. Vague promises are not enough.
If possible, clean a sample using the products planned for regular maintenance. Check for changes or surface damage. This test helps, but it cannot predict every production batch. I may still miss something.
Choosing Wood Texture Aluminium Profiles requires balancing appearance, function, and quality. Begin by understanding how these profiles are made: a wood-grain finish is applied to aluminium to combine a natural-looking surface with the material’s practical qualities. Define where the profile will be used and what it needs to withstand, such as frequent handling, moisture, sunlight, or everyday wear. These requirements help guide decisions about the profile’s shape, finish, and expected performance.
Next, compare grain patterns, colors, and surface effects with the surrounding design, while checking that the dimensions and coating specifications suit the project. Review samples in the intended lighting and inspect their finish for consistency and visible defects. Finally, assess the supplier’s ability to provide clear specifications, reliable quality checks, and suitable samples. A careful comparison of these factors helps you select profiles that meet both your design goals and practical needs.